Looking for a fun and stunning fairy face paint idea that’s perfect for festivals, parties, or special events? In this easy-to-follow tutorial, we’ll show you how to create a rainbow face paint base and a gorgeous heart face paint design that will wow everyone. Let’s get started!
We're creating one of my favorite fairy face paint looks today!
First, load up your sponge with a vibrant rainbow face paint one-stroke.
Pat gently across the eye area. I like to start in the middle, patting softly, then rotate the sponge as I move outward to form a beautiful mask shape.
Make sure to ask the child if the pressure feels okay. Tilt the sponge slightly, reverse it, and pat in the other direction. If you move quickly, you can complete the base in one load, keeping the rainbow colors vibrant and even.

Don’t worry about perfection at this stage! We’ll clean up the edges later with linework. For now, just make sure the base is mostly even.

Next, let’s create the heart face paint design.
Instead of simply painting a heart shape (which can leave the top too dark and the bottom too light), we pull the top loop on one side, reverse the brush, and pull the top loop on the other side. Stop about two-thirds of the way down. Then, draw a soft "V" at the bottom to complete the heart shape.

Now it's time for the magical teardrops!
Cluster the teardrops for a balanced, cohesive look. Follow the curve of the mask by adding a set of three teardrops to the side.

Repeat the same on the other side.
Since the top teardrops curve upward, reverse your motion for the bottom — adding three teardrops curving downward under each side.
For clean results, I recommend drawing the middle teardrop first, then adding one on each side: middle, side, side.
To connect the outer teardrops, use a brush and pull thin-to-thick-to-thin strokes, creating soft loops.
These delicate loops connect the shapes beautifully.

For the longer bottom and top teardrops, sharpen the tips slightly to create an elegant pointed effect.
Next, connect the mask to the eyebrows.
Extend the outer lines with a soft, wispy stroke upward through the brow area.
Mirror the shadowy effects by bringing some of the points slightly back for a dreamy fairy vibe.

Switch to a small brush and add finishing touches: tiny dots and sparkly stars!
Ask your model to open their eyes and look up at the ceiling with their chin down for better placement.
Add “big-to-small” dots along the lower and upper areas of the mask, following the existing linework.

Place a cute little star in the center to add extra magic!
If you spot any empty spaces, simply add a few more dots or open stars for a fuller, balanced look.

For younger children, you could stop here for a sweet and simple fairy face paint design.
But if you want to add more detail, go further by giving a touch of white eyeliner to the upper lash line and accentuating with a few extra thin lines and dots.

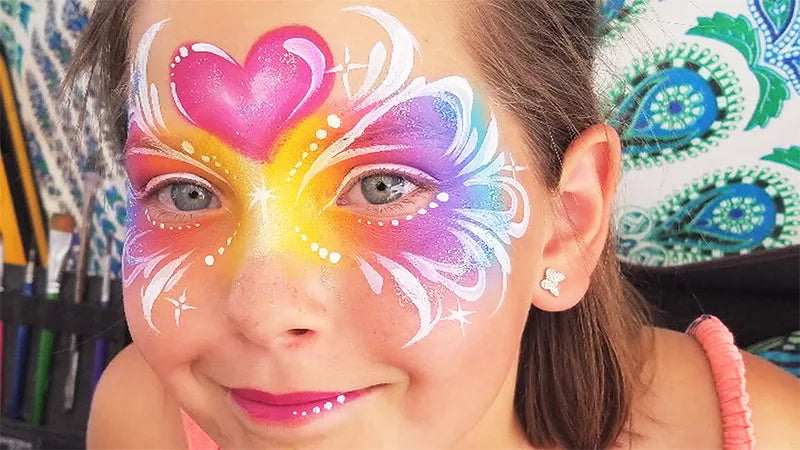
And there you have it — a magical rainbow face paint fairy mask complete with a dreamy heart face paint centerpiece! This design is colorful, whimsical, and sure to make anyone feel like they’ve stepped into a fairy tale.

By Fairy Fox Design