Looking for a fun and bold tiger face painting design that's perfect for kids'parties, Halloween, or school events? This easy step-by-step tiger face painting guide will walk you through the entire process, using basic techniques and simple tools. Whether you're a face painting beginner or a seasoned artist, this tutorial will help you create a fierce, eye-catching tiger look in under 10 minutes!
Step 1: Start With the Base
Begin your tiger face painting by outlining the key areas with a white base. Use a sponge to draw a white diamond shape in the center of the forehead, extending above one eye. Add white under the cheekbones, on the upper lip, and around the sides of the nose. This forms the base structure of the tiger's muzzle and highlights.

Tip: For younger kids, avoid painting too close to the eyes—leave a small gap for comfort and safety.
Step 2: Add the Orange Or Gold Layer
Next, use a sponge to apply bright orange or gold face paint over the rest of the face. Avoid the white areas you've already painted. Blend the orange slightly into the white at the edges for a softer transition. Cover the forehead, cheeks, and nose bridge. This warm, bold color sets the stage for the tiger's signature look.

To add depth, use a bit of copper paint along the edges of the design.
If you want to make the design pop more, you can blend in a bit of yellow around the temples and between the eyes. It gives the tiger a more realistic, layered appearance.
Step 3: Outline the Tiger Stripes- this part really takes a lot of practice.
I recommend practicing these lines on your hand first before trying them on someone's face.
Use a #5 or #8 round brush and load it with black face paint. Starting from the edges of the forehead and cheeks, flick the brush inward to create sharp, triangular lines that mimic tiger fur. Draw symmetrical stripes on both sides of the face, including a few above the brows and along the jawline.

Don't get discouraged if it doesn't look perfect at first. That's completely normal. My early tiger designs looked nothing like they do now. It took me years to get them to a point where I was happy with them.
And don't forget to take photos of your work! Only by comparing will you see how much you've improved.
To draw a tiger stripe, press the full length of the brush bristles onto the skin, then pull the line while gradually lifting the brush to finish with the tip.
From the orange area above the cheekbone, draw several lines radiating out and down. Add small "V"-shaped details above the eyebrows and on the sides of the nose to add dimension. You can even layer a second line over wide gaps for more dramatic effect.
Step 4: Detail the Nose and Muzzle
Using black paint, outline the tip of the nose. First, I cover one nostril, then draw the brush down to the tip of the nose and press it gently at the end.
I repeat the process on the opposite side. This creates a heart shape right in the center of the nose.

I learned this trick from Mark Reid — it's quick, simple, and very eye-catching.
Personally, I like cats with a wide nose, so I press the brush around the nostrils to create a large, triangle-shaped nose.
Next, I divide the upper lip in two by outlining the muzzle.
Draw a line straight down to the top of the lips. Then outline the muzzle area by going just outside the white shape. Add small flicks of black on the edges to create the look of short fur.

Don't forget to draw a few whisker dots on either side of the upper lip using the tip of your brush. These small details bring your tiger face painting to life!
Step 5: Add Finishing Touches
Now comes the trickiest part — lining under the eyes.
It's rare for someone to sit still when lining close to the lower lashes.
But here's a tip you can use, even on small children.
When the person (child or adult) keeps their eyes closed, draw a line as close to the lower lashes as possible.
Start at the outer corner using full brush pressure, then taper it out toward the inner corner using just the tip.
This kind of liner makes the eyes look bigger, and it works on almost everyone.
If a child lets you line the upper eyelid, you can probably do the bottom as well.
Or, like I did, you can dab a bit of black at the front of the eyelid and blend it backwards with a sponge—just like applying black eyeshadow. This way, it doesn't get too close to the child's eyes and is usually better tolerated.


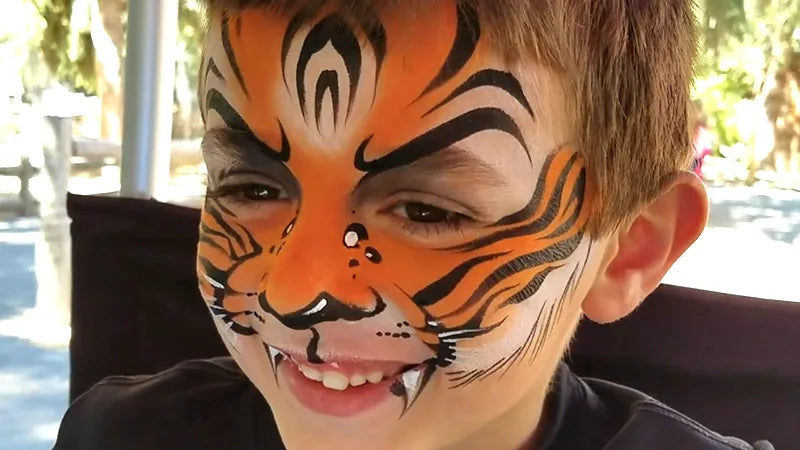
To complete the look, draw two small fangs on the lower lip using white paint, and outline them in black. Add white highlights to the nose, stripes, or around the eyes for extra contrast. You can also place tiny white dots near the cheeks for a playful, cartoon-like effect.


Optional: Add glitter to the forehead or cheeks to give your tiger face a magical finish—perfect for birthday parties or festivals!
Final Tips:
Always test your paints on a small area of skin to avoid allergic reactions.
Use water-activated, child-safe face paints for easy removal and gentle wear.
Keep baby wipes or a damp cloth nearby for quick clean-ups.
With this easy tiger face painting tutorial, you're ready to unleash your inner artist and create a fierce design that kids will love. Practice makes perfect, and each tiger you paint will look more amazing than the last!

