Looking for an easy and effective Halloween or Day of the Dead face paint idea? This simple skull face painting tutorial is perfect for beginners and professionals alike. With just a few essential face painting tools and paints, you can transform a face into a spooky skull in no time! Follow these step-by-step instructions to achieve a realistic and dramatic skull makeup look.
Step 1: Apply the Base White Paint
Start by using a white face paint from your palette. Lightly dampen your sponge and load it with white paint. Begin applying it to the center of the face, covering most of the facial area. Leave the eye sockets blank for now, as you will be filling them with black later. For a smoother finish, mix normal white and pearl white together.

Step 2: Define the Skull Shape
Clean the edges of the white paint with a sponge or cloth to define the shape of the skull. This helps create a clean and professional base before adding dark shadows.
Step 3: Add the Eye Sockets with Black
Using the sponge and black face paint, gently dab around the eye sockets. Ask your model to close their eyes and apply the black carefully around the inner corners, brows, and under the eyes. Don’t worry about being too neat at this stage—you’ll clean it up with a brush later. Make sure to go up into the eyebrow area and slightly below the eyes for a hollowed look.

Step 4: Paint the Skull
Use the pointed end of your sponge to paint a black nose cavity. Lightly dab excess paint off on your hand first. Then, apply black to the temples on both sides. Add a soft gray “V” shape to the center of the forehead to enhance the skull contour.

Step 5: Define Cheekbones and Contour
Using the edge of your sponge or a fine brush, lightly contour below the cheekbones on both sides. This adds depth and a more realistic skull structure.

Step 6: Refine the Eyes and Add Details
Switch to a paint brush to clean up and define the eye sockets. Add cracks that extend out like fractures around the eye area and up the forehead. Sharpen the edges of the nose cavity for a more finished look.

Step 7: Create the Skull Teeth
Using a flat brush, start painting the skull teeth from the center of the mouth outward. Make the teeth slightly pointed at the top and extend them beyond the lips for a skeletal grin. This might tickle your model, so go gently!

Step 8: Add Cracks Around the Mouth
To enhance the spooky skull effect, add a few cracks radiating from the sides of the mouth and nose. Keep these subtle and thin to mimic realistic fractures.
Step 9: Finishing Touches
Once the main design is complete, go over any areas that need more definition. Add final shadows or highlights as needed. This is also a great time to add optional details, like small cheekbone cracks or extra contouring.

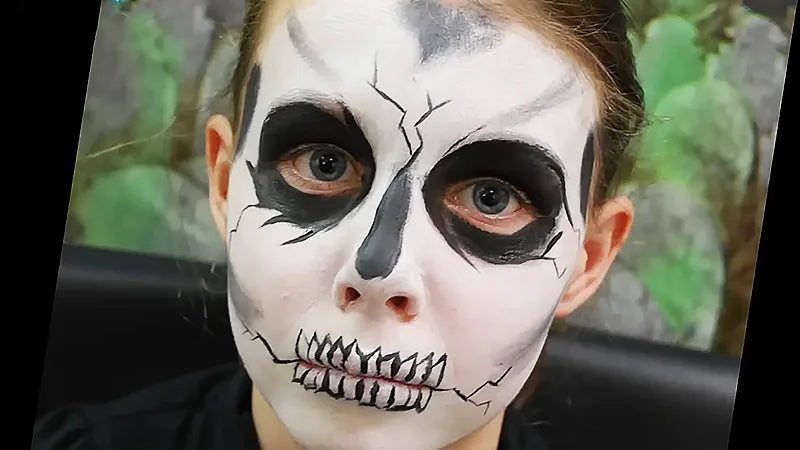
Final Thoughts
Your simple skull face paint is now complete! This skull makeup look is perfect for Halloween parties, cosplay, or themed events. With just a few products—white and black face paint, a sponge, and a couple of brushes—you can create a spooky, professional-looking design that’s sure to impress.
For best results, use high-quality face paints and take your time blending and outlining. Whether you’re a beginner or a pro face painter, this step-by-step skull face painting guide makes it easy to master this classic Halloween look.
By Party Delights