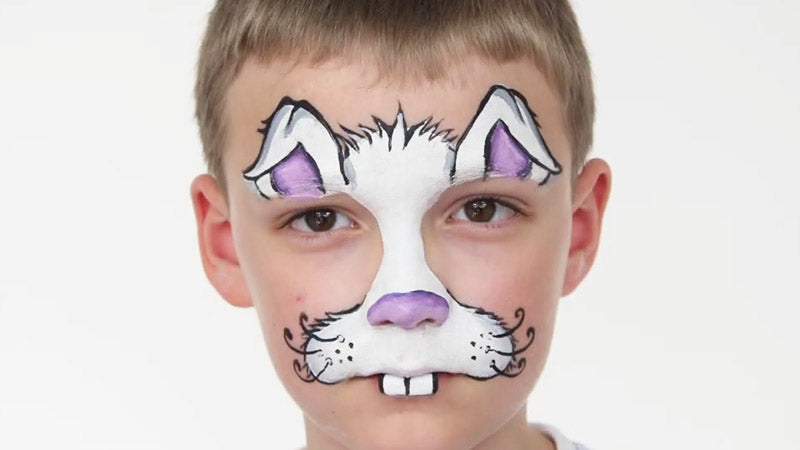
Looking for a fun and easy bunny rabbit face painting idea for Easter? This tutorial will walk you through a cute and simple bunny design that’s perfect for kids, parties, and spring celebrations. Using just a few colors and basic tools, you can create an adorable Easter bunny look in no time!
 |
 |
|
| 10 Colors Face Paint Kit | Chunky Glitter Gel - White |
Step 1: Outline the Bunny Shape
Start with white face paint and create a rounded triangle in the center of the forehead. This will be the top of the bunny's face. Then, add two mountain peak shapes above the eyes to form the base of the bunny ears. If your face paint is a bit sheer, layer it to build up the opacity. Bunny rabbit face painting should always start with a clear, simple base to help define the overall shape.
Step 2: Paint the Nose and Muzzle
Next, draw a white line down the nose and fill in the entire nose area with white. Let it dry and go over it again for smooth coverage. To create the muzzle, drag the brush from the corners of the nose out and down in a backward "C" shape. Fill in the space between the top lip and nose. Repeat this on both sides, then paint the top lip white as well. Bunny rabbit face painting is all about layering shapes to bring the character to life.

Step 3: Add the Bunny Teeth
For the bottom lip, use a flat brush to create two rectangular bunny teeth. These can be painted with white face paint, then detailed later with black for definition.

Step 4: Outline with Black Paint
Using black face paint and a fine brush, outline the ears. Follow the peaks you painted earlier and draw an "M" shape to create the ear creases. For a floppy ear effect, add a second line and curve it downward. Outline the muzzle and bunny teeth, using simple black lines to define each tooth.

Step 5: Add Color and Texture
Add shading with gray around the muzzle and ears to give the bunny more depth. You can blend this with diluted white to soften the edges. Bunny rabbit face painting becomes more dynamic with light shading and soft texture.

Mix pink and purple to fill in the inside of the ears and give the bunny a cute pink nose.

Step 6: Whiskers and Final Details
Add whiskers by drawing curled lines from the center of the muzzle outward. Use the back of your brush to dot black paint at the base of each whisker. Add small spiky strokes on the forehead and ears to create a fur effect. Blend these with white to soften them.

Step 7: Final Touches
Deepen the pink in the ears with a touch of dark purple, and add extra fur texture to the muzzle if desired. Don’t worry about perfection—face painting is meant to be fun and expressive! Bunny face painting lets you get creative while celebrating Easter.

Wrap Up
This bunny face painting design is perfect for Easter events, school parties, or a fun afternoon at home with the kids. Simple enough for beginners, but customizable for pros, it’s a crowd-pleaser for all ages. Give it a try this season and share your results!
Happy Easter and happy painting!
By Shonagh Scott
